

Hello! 👋 Welcome back to our exploration of the Intersection Observer API. In our previous section, we delved into the details, discussing both the advantages and limitations of this powerful API. If you missed it, feel free to catch up by reading my last blog post here. Now, let’s take our understanding to the next level as we dive into practical use cases. Buckle up, because we’re about to create some exciting real-world examples! 🚀📝.
Ok, enough with the chatter. Let's talk about today's agenda. Like I promised in our last discussion, we will be building a simple landing page to solidify our understanding of this awesome API. 🌟
The Intersection Observer API is a powerful tool that facilitates visibility tracking of elements within the viewport or their parent elements. It’s incredibly versatile and has a wide range of practical applications. Here are some real-world scenarios we mentioned earlier where you can leverage this API:
Lazy Loading of Images: Improve page load performance by loading images only when they come into view.
Infinite Scrolling: Dynamically load content as the user scrolls down the page.
Scroll-Spying Navigation Bars: Create navigation menus that highlight active sections based on the user’s scroll position.
Ad View Tracking: Detect whether an ad was viewed by the user.
Article Read Stats: Measure how much of an article a user has read (think medium view vs. read stats).
In the upcoming examples, we’ll focus on the JavaScript involved and demonstrate how to implement some of these use cases using the Intersection Observer API. So, let’s get started! 🚀

Before anything, we will be building something like this, with a sticky navigation bar, some text-fade-in animations, and lazy image loading. Let's take a look at some code snippets. Now, for a live experience of how the app works, you can check it out on Code Sandbox or clone my GitHub repo.
Sections:
Setting up the Intersection Observer
Observing Hero for sticky navigation header
Observing section for text-fade-in animations
Observing section for removing blur effects on the image.
Setting up the intersection observer

The code snippet defines a custom React hook called useInterSectionObserver. This hook utilizes the Intersection Observer API to observe changes in the visibility of a specified DOM element. Let’s break it down:
Hook Signature:
The hook takes three arguments:
ref: A React ref represents the DOM element to be observed.options: An object that describes how the Intersection Observer should behave (e.g., thresholds, root, rootMargin).callback: A function that will be executed when the observed element intersects with the viewport or its parent element.
Observer Callback:
Inside the hook, there’s a
useCallbackfunction that defines the observer callback.This callback creates a new
IntersectionObserverinstance, passing in the providedcallbackfunction andoptions.The observer is returned from this callback.
Effect Hook:
The
useEffecthook is used to manage the lifecycle of the observer.When the component mounts or when any of the dependencies (
callback,observerCallback,options, orref) change, the effect runs.If the
entity(the observed DOM element) exists, the observer is created using the previously defined callback (observerCallback).The observer starts observing the
entity.When the component unmounts or when the
entitychanges, the cleanup function is executed, which stops observing theentity.
Observing Hero for sticky navigation header
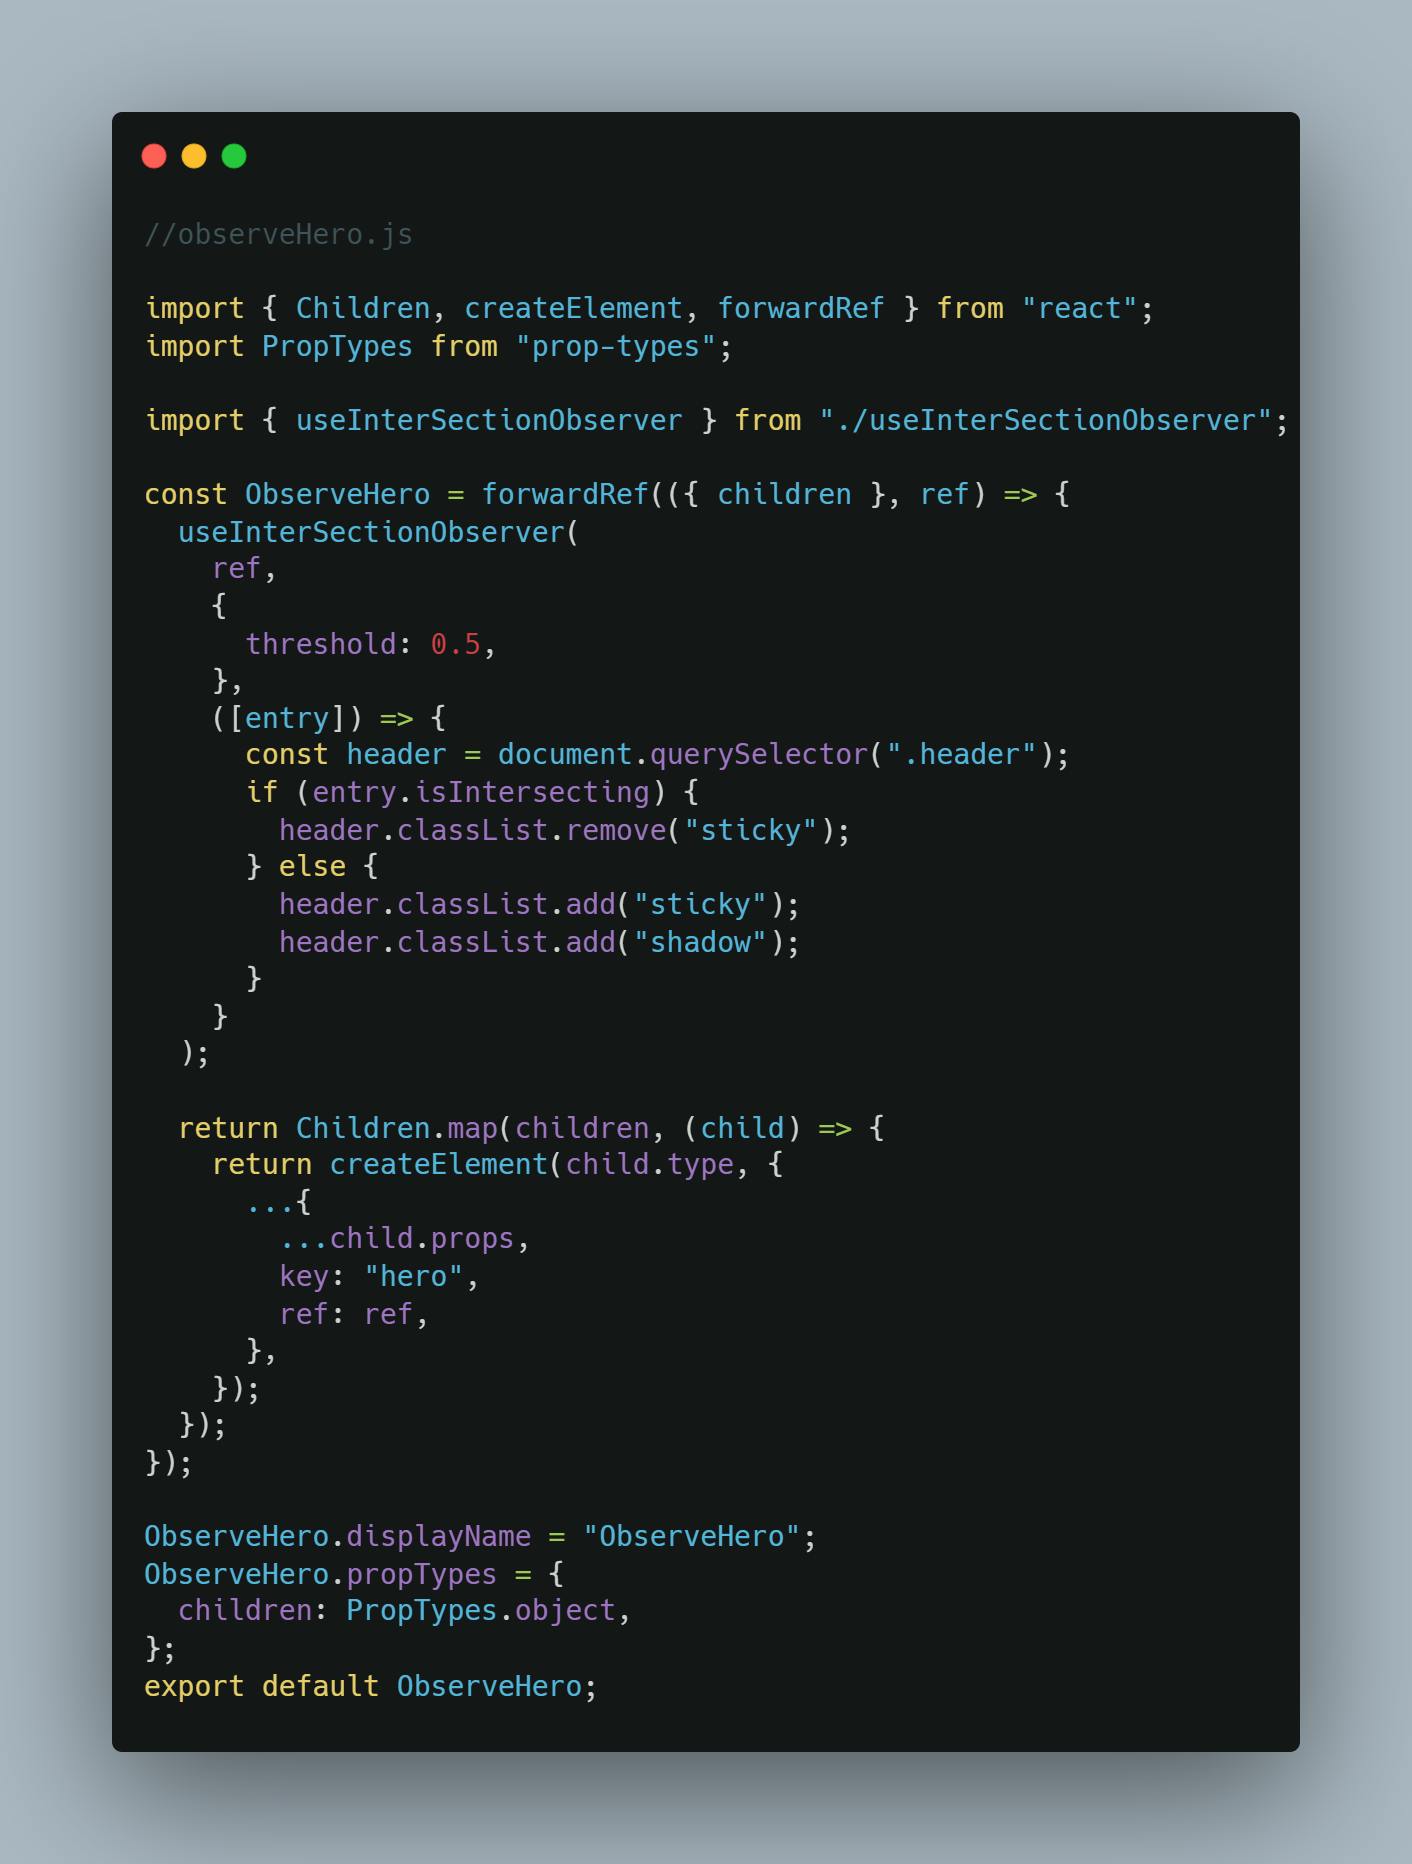
The code defines a custom React component called ObserveHero. This component leverages the Intersection Observer API to observe changes in the visibility of a specified DOM element. Let’s break it down:
Component Signature:
The
ObserveHerocomponent is a functional component created using theforwardReffunction.It accepts two props:
children: The child elements to be wrapped by this component.ref: A React ref representing the DOM element to be observed.
Intersection Observer Hook:
Inside the component, we use the
useInterSectionObserverhook.This hook sets up an intersection observer to observe the provided
ref.The observer is configured with a threshold of
0.5, meaning that the callback will be triggered when at least 50% of the observed element is visible in the viewport.
Callback Function:
The callback function is executed when the observed element intersects with the viewport.
If the element is intersecting, it removes the CSS classes
stickyfrom the.headerelement.Otherwise, it adds both
stickyandshadowclasses to the.header.
Child Elements:
The
ObserveHerocomponent wraps its children with the providedref.It maps over the children and clones them, ensuring that the
refis passed down to each child.
Summary:
This component abstracts away the complexity of manually handling scroll positions and visibility checks.
The
ObserveHerocomponent is used to create various effects, such as sticky navigation bars or animations triggered by element visibility.

Finally, we make use of our ObserveHero component and observe that when our Hero component is 50% into the viewport, we trigger the sticky behavior of the Header component.
- Note: I made use of styled components; if anything seams off, recall its styled components.
Observing section for text-fade-in animations

Component Signature:
Here too, we forward the
childrenandrefto this component.Intersection Observer Hook:
Like before, we make use of our custom
useIntersectionObserverhook.Callback Function:
If the element is intersecting, it performs the following actions:
Finds the
.titleelement within the observed target and adds the CSS classshow-title. This triggers the fade-in animation.Updates the
srcattribute of an<img>element with the value from itsdata-srcattribute.Sets a timer to add the CSS class
title-afterto the.titleelement after a delay of 200 milliseconds.
If the element is not intersecting, it clears the timer (if any).
Summary:
- This section can be used for various effects, such as lazy loading of images, dynamic content transitions, or other interactions triggered by element visibility.
Observing section for removing blur effects on the image.
Ok, I wanted to walk through the section with you, then I thought it's the same as the previously explained section with just a minor change in css styles. So I am going to leave this as a challenge. Try it out and get hands-on experience with how it works. If you face any challenges, don't hesitate to ask. I have made the entire project code available in an interactive section Code Sandbox or visit my GitHub repo.
Conclusion:
Finally, I think this was a long one. What do you think? But what is most important is that we get to see how to take advantage of this awesome API to make amazing transitions between different sections in our demo landing page application. If anything was not clear, don't hesitate to reach out to me.😁
Remember, challenges are where we learn and grow the most. So, I encourage you to experiment, tweak, and build upon what you’ve learned. If you encounter any hurdles or have questions along the way, feel free to reach out.😊
Keep coding, keep exploring, and happy building! 🚀